


These Pickled Radishes are one of my favorite ways to add a little crunch and tang to everyday meals. They’re made with just 4 simple ingredients and take only 15 minutes to pickle. I love keeping a jar in the fridge for tacos, sandwiches, and salads.
Jump to Recipe
Why This Recipe Works
I love keeping a jar of these Pickled Radishes in my fridge for a quick, crunchy topping. They’re tangy, fresh, and so easy to make with just a few simple ingredients!
- Quick and Easy: These radishes take just 5 minutes of prep and are ready to enjoy in as little as 15 minutes. I love how little effort they need, just like my Pickled Vegetables.
- Perfectly Crisp and Crunchy: The radishes keep their fresh, satisfying crunch even after soaking in the brine. It’s one of my favorite things about radishes, whether they’re pickled or served simply like these Radishes with Butter and Salt.
- Mild and Tangy Flavor: Rice vinegar gives these radishes a gentle tang without overpowering their natural flavor. You can also use white vinegar if you prefer a stronger, sharper bite.
- Easy to Customize: I love adding fresh dill, garlic, or red chili flakes for extra flavor. You can even toss in sliced carrots, onions, or jalapeños to make the jar your own.
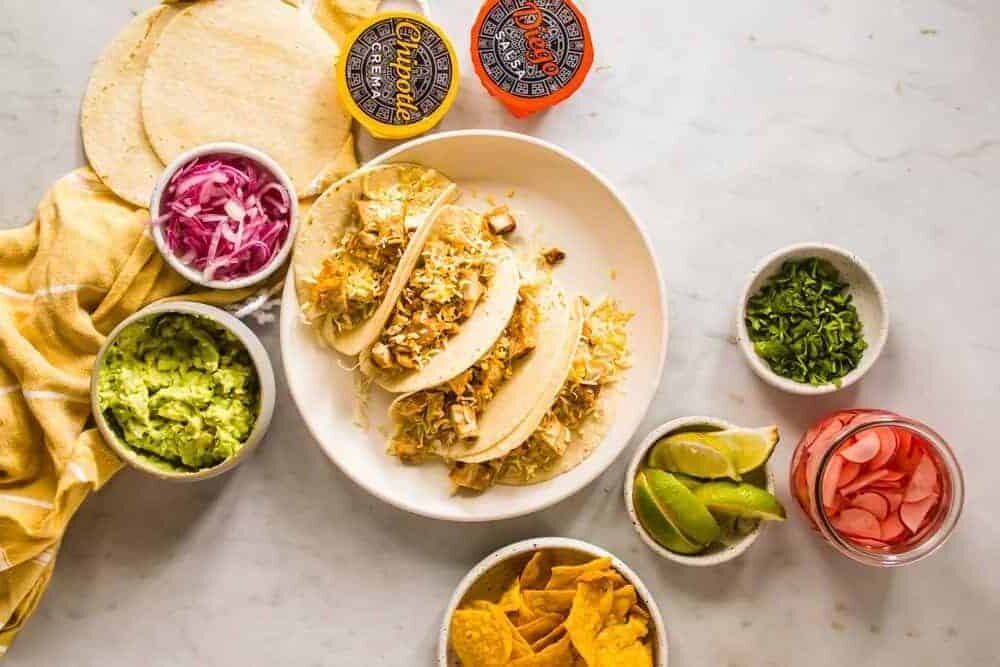
- Goes with Everything: These pickled radishes are delicious on tacos, burgers, sandwiches, and salads. I especially love adding them to chicken tacos with chipotle crema for a fresh, tangy crunch.
If you enjoyed this recipe, please come back and give it a rating. I ❤️ hearing from you!
Ingredients
- Fresh Radishes – The star of this recipe! I like using fresh, firm radishes for the best crunch. Thinly slice them with a sharp knife or mandolin so they pickle quickly and evenly.
- Hot Water – Helps dissolve the salt and creates the base of the pickling brine. Make sure the water is hot but not boiling to help the radishes keep their crisp texture.
- Rice Vinegar – My favorite vinegar for pickling because of its mild, slightly sweet flavor. It gives the radishes a gentle tang without overpowering them. You can substitute white vinegar for a stronger, sharper flavor, but use a little less.
- Kosher Salt – Adds flavor, balances the acidity of the vinegar, and helps the radishes pickle. I prefer kosher salt because it dissolves easily and gives the brine a clean, balanced taste.
For full list of ingredients and instructions, see recipe card below.
Instructions

- Slice Radishes: Wash and thinly slice 8 fresh radishes using a sharp knife or mandolin. Try to keep the slices even so they pickle at the same rate.
- Make Pickling Brine: Add 1 ½ cups of hot water, 2 tablespoons of rice vinegar, and 1 ½ teaspoons of kosher salt to a jar. Stir well until the salt dissolves completely.
- Add Radishes: Place the sliced radishes in a mason jar and pour the pickling brine over them, making sure they’re fully submerged.
- Quick Pickle: Let the radishes sit in the brine for 15–30 minutes, or until the liquid has cooled. They’ll soak up the tangy flavor while keeping their crisp crunch.
- Serve and Enjoy: Add your Pickled Radishes to tacos, sandwiches, salads, burgers, or breakfast dishes for a fresh, tangy bite. Store any leftovers in a sealed jar in the refrigerator.
For full list of ingredients and instructions, see recipe card below.

Substitutions & Variations
Here are some of my favorite substitutions and variations:
- Spicy Pickled Radishes: I like adding a pinch of red chili flakes or a few thinly sliced jalapeños to the jar for a little heat. You can adjust the amount depending on how spicy you like them.
- Fresh Herbs: Try adding a few sprigs of fresh dill for a light, herby flavor. I especially love this version on sandwiches and salads.
- Garlic Pickled Radishes: Add 1 or 2 lightly smashed garlic cloves to the brine for a savory, garlicky flavor. I love using these on burgers and chicken tacos.

What to Serve with Pickled Radishes
Tacos and Mexican Favorites
- For Taco Tuesday, we love adding these crunchy pickled radishes to Chili Lime Shrimp Tacos With Cabbage Slaw or Salmon Fish Tacos. Their tangy crunch pairs beautifully with the juicy seafood and creamy toppings.
- If we’re planning a fun family dinner, Instant Pot Chicken Carnitas and Shrimp Tostadas are delicious options. The pickled radishes add a refreshing pop of flavor to the savory fillings.
- For something a little different, try Healthy Taco Bowls or Beer Battered Fish Tacos. A generous handful of pickled radishes makes either meal even more flavorful.
Sandwiches and Burgers
- For a fresh, flavor-packed lunch, serve these pickled radishes with Air Fryer Chicken Banh Mi or Chicken Meatball Banh Mi. Their Vietnamese-inspired flavors and crunchy vegetables make them a natural match for quick pickled radishes.
- If we’re craving burgers, Banh Mi Burgers and Easy Chili Lime Chicken Burgers are two great options. The bright, tangy radishes add the perfect finishing touch to juicy, savory patties.
- For a casual family meal, try Easy Crockpot Pulled Pork or Steak Sandwich Recipe. Add the pickled radishes right on top for a delicious crunchy contrast.

FAQs
These quick Pickled Radishes are ready to enjoy in as little as 15 minutes! I recommend letting them sit in the brine for 15–30 minutes, or until the liquid cools, so they absorb the tangy flavor while keeping their crunch.
Rice vinegar is my favorite because it has a mild flavor that doesn’t overpower the radishes. You can also use apple cider vinegar, champagne vinegar, or white wine vinegar. If you prefer a stronger, sharper flavor, substitute 1 ½ tablespoons of white vinegar for the 2 tablespoons of rice vinegar.
No, there’s no need to peel them! Just wash the radishes thoroughly, trim the ends, and slice them thinly. I love leaving the skins on because they add a pretty pink color to the pickling brine.
That’s completely normal! The natural pigments in the radish skins can seep into the brine as they pickle, giving the liquid and radish slices a beautiful pink color. It doesn’t affect their flavor or texture.
Store your Pickled Radishes in a clean, airtight jar in the refrigerator, keeping them submerged in the brine. Since this is a quick pickle with a mild vinegar brine, I recommend enjoying them within 3–4 days rather than storing them for several weeks.

More Recipes You’ll Enjoy
- Pickled Onions Recipe – Learn how to make Lena’s Kitchen Pickled Onions Recipe and transform any meal from good to great. Top your tacos, burgers, salads, or eggs!
- Refrigerator Dill Pickles Recipe – This Refrigerator Dill Pickles Recipe (Keto and Whole30) is made by throwing everything in a jar. In 1 day, you have crisp homemade pickles!
- Steak Crostini with Horseradish Sauce – Steak crostini with horseradish sauce is the show-stopping appetizer you need. Plus, it’s easy to prep ahead and assemble at the last minute!
- Spicy Cucumber Salad – This 15-minute spicy cucumber salad has the perfect blend of bold, refreshing, and fiery flavors! Enjoy it as a side, snack, or light main.
If you try this Pickled Radishes recipe, let me know what you think! Rate and review this recipe in the comments below. Don’t forget to take a picture and tag me on Instagram @lenaskitchenblog!

Quick Pickled Radishes
Ingredients
- 8 radishes, thinly sliced
- 1 ½ cups water, hot water
- 2 tablespoons rice vinegar, or replace with 1 ½ tablespoons of white vinegar for stronger flavor
- 1 ½ teaspoons kosher salt
Instructions
- Thinly slice radishes using a sharp knife or a mandolin.
- Add warm water, rice vinegar and salt to a jar, mix to combine.
- Add the sliced radishes for a mason jar, add the pickling liquid. Let the radishes stand for at least 15-30 minutes to quick pickle or until the water has cooled off.
- Enjoy these on tacos, breakfast, salad or sandwiches.
Notes
- Choose fresh radishes. Look for firm, bright radishes without soft spots or wrinkles. Fresh radishes will give you the best crunch after pickling.
- Slice them thinly. Use a mandolin or sharp knife to cut the radishes into thin, even slices. The thinner they are, the faster they’ll absorb the pickling brine.
- Use hot, not boiling water. Warm water helps dissolve the salt quickly without softening the radishes too much. This keeps them nice and crisp.
- Dissolve the salt completely. Stir the salt into the warm water and vinegar before adding the radishes. This ensures the brine is evenly seasoned.
- Keep radishes submerged. Make sure all the slices are covered with the pickling liquid. Use a smaller jar if needed to keep everything submerged.
- Give them enough time. The radishes are ready after 15 minutes, but I like leaving them for 30 minutes for a little more tang. They’ll continue developing flavor as they sit.
- Adjust the vinegar. Rice vinegar gives these radishes a mild, tangy flavor. For a stronger bite, swap the 2 tablespoons of rice vinegar for 1 ½ tablespoons of white vinegar.
- Add extra flavor. Toss in fresh dill, smashed garlic cloves, black peppercorns, or red chili flakes before adding the brine. These simple additions give the radishes a little more depth.
- Make them ahead. Prepare the radishes before starting dinner so they have time to pickle while you cook. They’re especially delicious on chicken tacos with cabbage and chipotle crema.
- Store them properly. Once cooled, keep the radishes in a clean, airtight jar in the refrigerator with the brine covering them. Since this recipe uses a mild vinegar brine, enjoy them within 3 to 4 days rather than storing them for several weeks.
- Drain before serving. Use a fork or slotted spoon to remove the radishes from the brine. This prevents excess liquid from making tacos, sandwiches, or salads soggy.


Preska Ehm Dare
Why on Earth would you have me NOT put the radishes in the jar first? Do you honestly think I can put brine in a jar, and have all of those radishes fit? I’d share a photo, but I don’t have that luxury here. I’ll just put it on Twitter. 🙂
lena gladstone
Mine fit in my jar, but for next time you can add the radishes in first and then add the liquid. I’ll make that note in the recipe.