• Home
  • Recipes
  • About
  • Contact

Search

  • Home
  • Recipes
  • About
  • Contact

Subscribe for EASY meals!

  • Appetizers
  • Breakfast
  • Sides
  • Dinner
  • Salads
  • Soups
  • Skip to primary navigation
  • Skip to main content
  • Skip to primary sidebar
Lena's Kitchen

Lena's Kitchen

easy, elevated and approachable simple recipes for the everyday home cook

  • Weeknight Meals
  • Sides
  • Salads
  • Appetizers
  • Sweets

ukrainian

Syrniki (Ukrainian Cheese Pancakes)

Posted: April 10, 2026 by lena gladstone | Updated: April 11, 2026

This syrniki recipe is one of my favorite ways to bring a little comfort to the breakfast table. The farmer’s cheese makes each pancake soft and creamy inside with a golden, crisp edge. I love serving them warm with sour cream and a spoonful of jam.

Jump to Recipe
close up on 3 small pancakes topped with cream and blueberries on a white plate

Why This Recipe Works

Syrniki are one of those recipes that always make me feel at home. They’re simple, comforting, and full of creamy, lightly sweet flavor that works for both breakfast and dessert. Here’s what makes them so special:

  • Creamy Inside, Crisp Outside: The farmer’s cheese keeps the center soft and rich while the light flour coating gives each pancake a golden, crisp edge. It’s that perfect balance of textures you also get in Crispy Classic Potato Latkes.
  • Naturally Sweet and Balanced: These pancakes aren’t overly sugary. The mild sweetness lets the cheese flavor shine, making them just as good with honey as they are with fresh berries or jam.
  • Quick and Easy to Make: The batter comes together in minutes with simple ingredients you probably already have. They’re easy enough for a weekday breakfast but special enough for brunch.
  • Customizable for Everyone: You can make them plain or mix in dried cherries, raisins, or even bits of fresh fruit. I like to do half and half so everyone gets their favorite.
  • Perfect for Any Occasion: Serve them warm with sour cream and preserves for a traditional touch, or drizzle with syrup for a fun twist – just like these Bacon Pancakes. They’re always a hit no matter how you serve them.
pile of cooked small cheese pancakes on a white plate

If you enjoyed this recipe, please come back and give it a rating. I ❤️ hearing from you!

individual white bowls holding dried cherries, flour, eggs, sugar, and oil

Ingredients

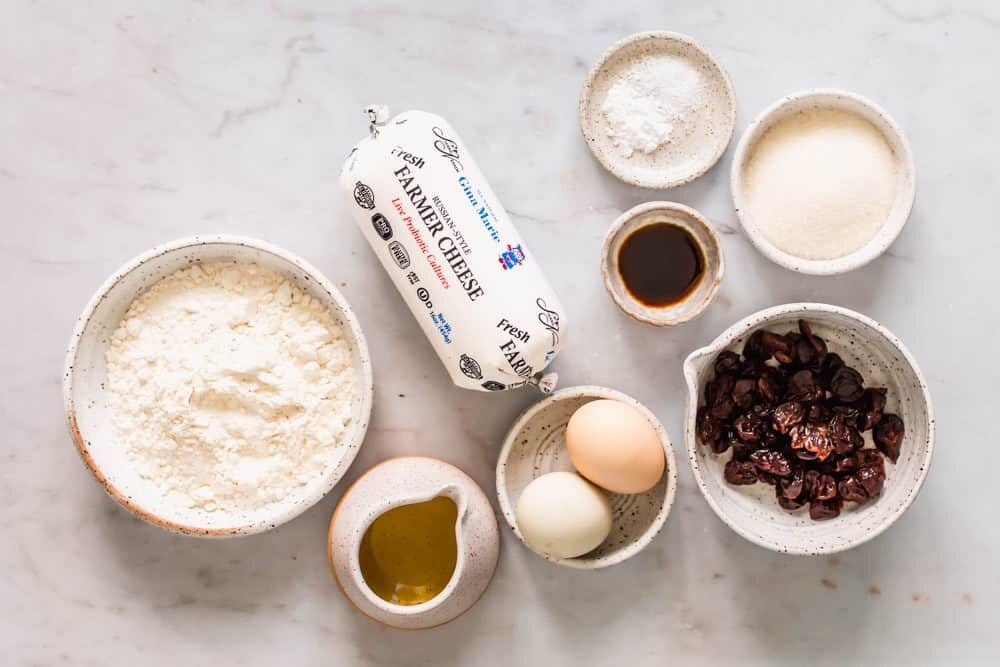
  • Farmer’s Cheese – The base of the recipe that gives syrniki their creamy texture and mild tang. You can substitute with well-drained ricotta or cottage cheese if you can’t find farmer’s cheese.
  • Vanilla – Adds a light sweetness and warm aroma that complements the cheese.
  • All-Purpose Flour – Provides structure and helps the pancakes hold their shape. You’ll also need extra flour for dredging before frying. For a gluten-free version, use almond or rice flour.
  • Baking Powder – Keeps the syrniki light and fluffy instead of dense.
  • Sugar – Adds just enough sweetness to balance the tang of the cheese. You can adjust the amount or use a keto-friendly sweetener if preferred.
  • Dried Cherries or Raisins (Optional) – Add a chewy, fruity bite to the pancakes. I like to make half the batch with dried fruit and half without.
  • Avocado Oil – Used for frying to give the syrniki a crisp, golden crust. You can also use vegetable oil or any light, neutral oil you have on hand.

For full list of ingredients and instructions, see recipe card below.

Instructions

  1. Soak the Fruit (Optional): Soak dried cherries or raisins in hot water for a few minutes to soften. Drain and set aside, or skip if not using.
  2. Make the Batter: Whisk eggs, then mix in farmer’s cheese and vanilla. Add flour, sugar, baking powder, and salt, and mix until a soft, thick dough forms. Fold in dried fruit if using.
  3. Form the Syrniki: Place ½ cup flour on a plate. Scoop dough into small portions, roll lightly in flour, and shape into ½-inch-thick patties.
  4. Heat the Oil: Heat 3-4 tablespoons oil in a large skillet over medium heat until hot.
  5. Cook the Syrniki: Fry patties for 3-4 minutes per side until golden and crisp. Transfer to a paper towel–lined plate. Cook in batches if needed.
  6. Serve: Serve warm with powdered sugar, maple syrup, or honey. Add sour cream, berries, or fruit preserves if desired.

For full list of ingredients and instructions, see recipe card below.

pile of golden brown cheese pancakes next to individual servings of pancakes with cream and berries on white plates

Substitutions & Variations

Here are some of my favorite substitutions and variations:

  • Cheese Options: I usually make syrniki with farmer’s cheese, but well-drained ricotta or cottage cheese works perfectly too. Just make sure to remove as much liquid as possible so the batter stays thick.
  • Fruit Add-Ins: Try mixing in chopped dried apricots, cranberries, or even small bits of fresh apple instead of raisins or cherries. I like to make half the batch with fruit and half without for variety.
  • Flour Swaps: For gluten-free syrniki, use almond or rice flour instead of all-purpose. If you’re going keto, coconut flour works great too – just use a little less since it absorbs more moisture.
close up on 3 small pancakes topped with cream and blueberries on a white plate

What to Serve with Syrniki

Breakfast

  • Syrniki are a cozy breakfast favorite that pair beautifully with other sweet morning treats. We love serving them alongside a warm Cream Cheese Berry Danish or a batch of Homemade Strawberry Pop-Tarts for a colorful brunch spread.
  • They’re also delicious next to an Easy Cheese Danish Recipe or Strawberry Scones With Lemon Glaze when you want a mix of textures and flavors on the table.

Sauces & Extras

  • For a simple finishing touch, drizzle your syrniki with Rhubarb Simple Syrup or top them with a pat of Sweet & Savory Compound Butter.
  • If you prefer something classic, a spoonful of Homemade Butter melting over the warm pancakes is always a comforting choice.
pile of golden brown cheese pancakes next to individual servings of pancakes with cream and berries on white plates

FAQs

Can I make syrniki keto-friendly?

Yes! Syrniki are already high in protein but to make them keto-friendly, replace the flour with almond or coconut flour and replace the sugar with 1 teaspoon of stevia or a keto-friendly sugar.

Why is my batter too sticky?

If your batter feels too sticky to handle, add a little more flour, one tablespoon at a time, until it firms up. The dough should be soft but not wet, so it holds its shape when forming patties.

What toppings go best with syrniki?

Traditionally, they’re served with sour cream and fruit preserves. You can also try maple syrup, honey, or a spoonful of Greek yogurt with fresh berries for a lighter option.

How long does it keep?

Store leftover syrniki in an airtight container in the fridge for up to 3 days. Reheat them gently in a skillet or microwave until warm. You can also freeze cooked syrniki for up to 2 months and reheat straight from frozen in a nonstick pan.

Watch Me Make Syrniki:

Youtube video

More Recipes You’ll Enjoy

  • Potato Vareniki – Potato Vareniki (Ukrainian Pierogi Recipe) is a comforting Eastern European dish and the best way to use up leftover mashed potatoes.
  • Kotleti Recipe (Meatballs) – Try my family kotleti recipe for a classic Ukrainian dinner! These “meatballs” are tender, juicy, and pan-fried to golden-brown perfection.
  • Brown Butter Sage Gnocchi – This simple brown butter sage gnocchi takes 15 minutes yet tastes so gourmet. Enjoy it on weeknights, or make it for special date nights!
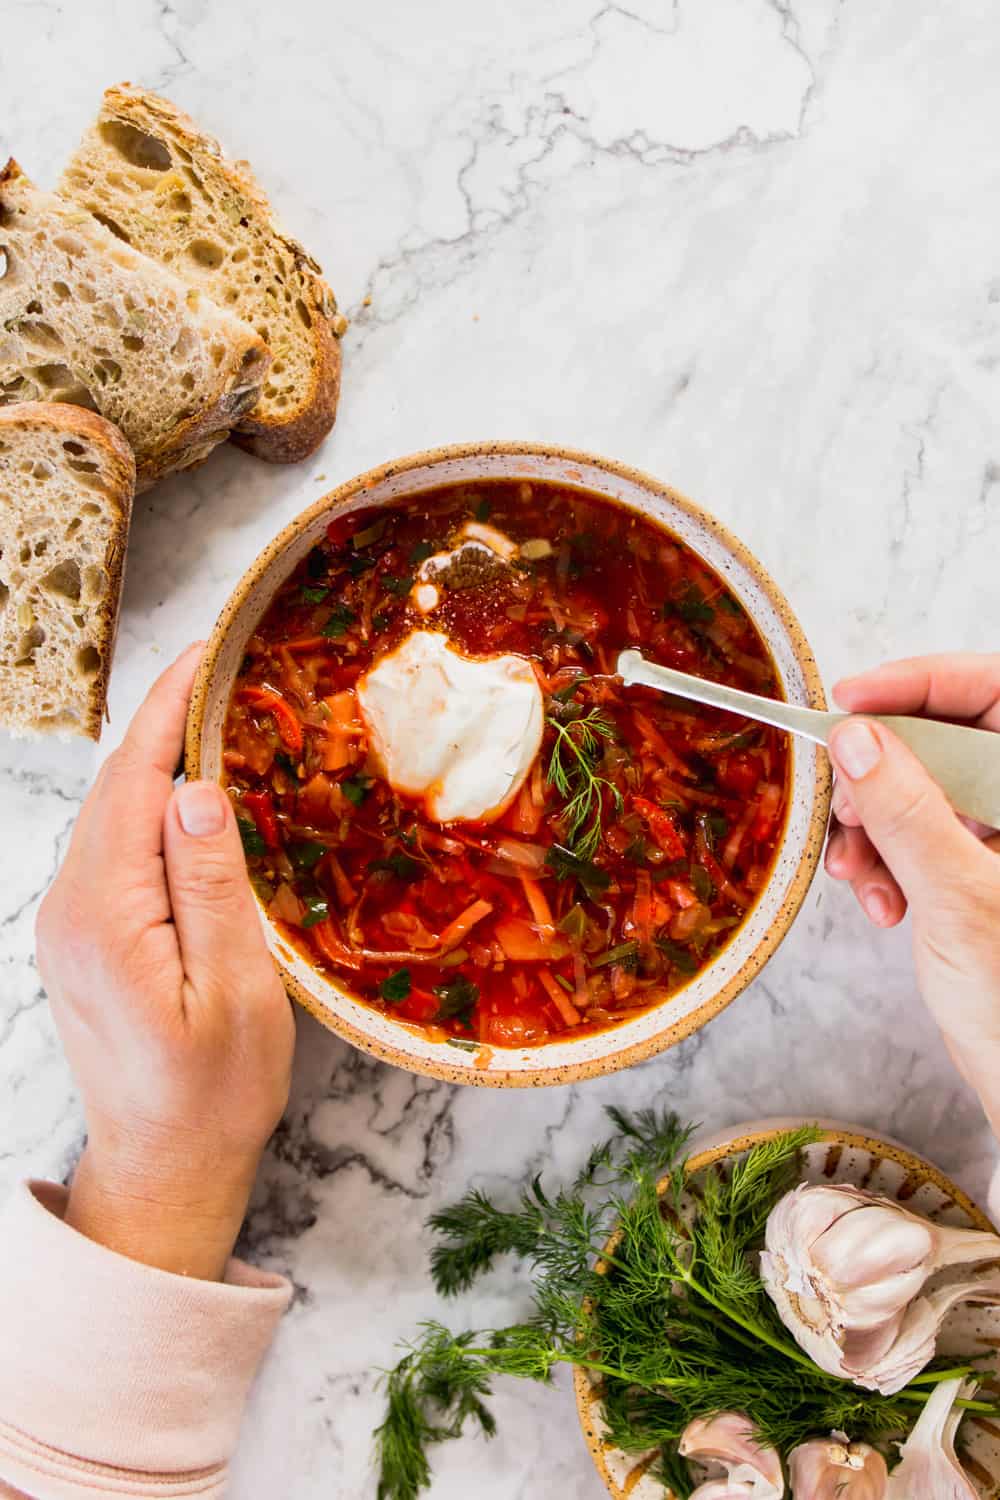
  • Classic Ukrainian Red Borscht (Beet Soup) – This flexible and frugal Classic Ukrainian Red Borscht (Beet Soup) recipe is made with heaps of vegetables and a homemade beef broth.

If you try this Syrniki recipe, let me know what you think! Rate and review this recipe in the comments below. Don’t forget to take a picture and tag me on Instagram @lenaskitchenblog!

Print Recipe
4.24 from 39 votes

Syrniki Recipe (Ukrainian Cheese Pancakes)

This sweet, moist, and irresistible Syrniki Recipe (Ukrainian Cheese Pancakes) is sure to become your new favorite treat for breakfast or dessert. Easy to make gluten free and keto!
Prep Time15 minutes mins
Cook Time10 minutes mins
Total Time25 minutes mins
Course: Breakfast, Brunch, Dessert
Cuisine: Russian, Ukranian
Diet: Vegetarian
Keyword: syrniki
Servings: 4 servings
Calories: 586kcal
Author: Lena Gladstone

Ingredients

  • 1 pound farmers cheese or use well drained ricotta or cottage cheese
  • 2 eggs
  • 1 teaspoon vanilla
  • ½ cup all purpose flour plus ½ cup for dredging
  • ½ teaspoon baking powder
  • ¼ cup sugar
  • ¼ teaspoon kosher salt
  • ½ cup dried cherries or raisins (optional)
  • 8 tablespoons avocado oil or any light oil for frying

Instructions

Dried fruit tip

  • In a small bowl, soak the dried cherries or raisins in hot water to soften, while you make the dough. Skip if not using any dried fruit. I like to do half the batter with dried fruit and half without.

Make the syrniki batter

  • Whisk 2 eggs in a large bowl and add the farmer's cheese and vanilla. Sift in ½ cup flour, sugar, baking powder, and salt, mix until combined with a fork. The batter will be thick like dough, not like traditional pancake batter. Divide dough in half and add dried fruit if you'd like to use fruit, or add fruit into the full recipe.

Form the syrniki

  • Prepare a plate with ½ cup of flour – you will use it to coat the pancakes. Using a cookie scoop, scoop the batter into the flour. Gently roll around with your hands. Add the dough into your hands, gently press the pancakes to form a patty shape. Dust off any remaining flour, you only need a light coating.

Cook the syrniki

  • Tip: Before you start frying your syrniki make sure the oil in the frying pan is hot by sprinkling a bit of flour into it. If it sizzles it’s hot enough.
  • Using a large nonstick skillet, heat 3-4 tablespoons of oil, and gently place the flour-dredged cheese pancakes into the pan. Cook on medium heat for about 3-4 minutes per side, or until each side is golden brown. Place on a paper towel to drain and cool.
  • Do not crowd the pan – cook them in 2-3 batches if necessary.

Serving options

  • To serve, sprinkle with powdered sugar, or drizzle with maple syrup or honey. Try the traditional Russian way of topping with sour cream and fresh berries or preserves.

Notes

  • Drain the cheese well. Extra moisture can make the batter too sticky, so press out as much liquid as possible from ricotta or cottage cheese before mixing.
  • Keep the batter thick. Syrniki dough should be firm enough to shape into patties, not pourable like pancake batter.
  • Test the oil temperature. Sprinkle a little flour into the pan—if it sizzles, the oil is ready for frying.
  • Don’t overcrowd the pan. Give each pancake space so they cook evenly and develop a crisp, golden crust.
  • Flip gently. Use a thin spatula and turn the syrniki carefully to keep their shape intact.
  • Adjust sweetness. Add more or less sugar depending on how you plan to serve them—less for savory toppings, more for sweet ones.
  • Make ahead. Form the patties and refrigerate them for up to a day before frying for a quick breakfast.
  • Reheat easily. Warm leftover syrniki in a skillet over low heat or in the oven at 350°F for a few minutes to bring back their crisp edges.
  • Try half with fruit. Mix dried cherries or raisins into half the batter so you can offer both plain and fruity options.
  • Serve warm. Syrniki taste best fresh from the pan with a dollop of sour cream, jam, or honey on top.
 
If you enjoyed this recipe, please come back and give it a rating. I ❤️ hearing from you! 

Nutrition

Calories: 586kcal | Carbohydrates: 36g | Protein: 21g | Fat: 40g | Saturated Fat: 10g | Polyunsaturated Fat: 4g | Monounsaturated Fat: 21g | Trans Fat: 0.01g | Cholesterol: 119mg | Sodium: 686mg | Potassium: 49mg | Fiber: 2g | Sugar: 21g | Vitamin A: 657IU | Calcium: 58mg | Iron: 1mg

You might also like:
Three glass jars filled with granola are arranged on a table with loose granola pieces and small white flowers nearby.Maple Granola Recipe
These Fluffy Buttermilk Waffles are not your average waffles! Easy to make with 8 simple ingredients, this epic breakfast has an upgraded flavor and texture to help the meal feel extra special.Buttermilk Waffles Recipe
Puff Pastry Quiche Recipe
Glass jars filled with chia pudding topped with blackberries, blueberries, and a raspberry, with a gold spoon and a mint leaf for garnish.Overnight Chia Seed Pudding
A slice of baked oatmeal with blueberries on a white plate, garnished with more blueberries and a dollop of cream, with a fork holding a piece.Healthy Baked Oatmeal
Three golden-brown apple turnovers on a white plate, surrounded by apple slices, a cup of milk, a bowl of sugar, and additional turnovers on a cooling rack.Apple Turnovers with Puff Pastry
Tater Tot Breakfast Casserole Recipe
Croissant French toast bake.Croissant French Toast Bake

Easy Crepe Recipe

Posted: June 18, 2025 by lena gladstone | Updated: July 9, 2025

A hand drizzles honey over crepes made with an easy crepe recipe, topped with whipped cream and mixed berries on a white plate, with juice and fruit in the background.

This Easy Crepe Recipe comes straight from my mom’s kitchen. I grew up eating these tender crepes, and now I love making them for my own family. Her simple blend-and-pour method makes them just right for sweet or savory fillings.

Jump to Recipe
Two tender crepes made with an easy blend-and-pour method are folded and topped with berries and cream, served on a plate beside a jar of jam, a glass of orange juice, and a bowl of mixed berries.

Why This Recipe Works

This Easy Crepe Recipe is one of my favorite ways to bring a little elegance to the table without any fuss. Here’s why I keep coming back to it:

  • Quick and Foolproof Batter: I love that all it takes is a quick blend to get perfectly smooth batter. No fancy steps or long resting time required. Just pour and cook.
  • Tender and Light Every Time: These crepes come out beautifully thin with soft edges that never feel rubbery. They’re delicate but still hold up to any filling I pile on.
  • Sweet or Savory, Always Delicious: I can go classic with Nutella and berries or switch it up with ham, cheese, and arugula. The batter is just slightly sweet, which makes it perfect either way.
  • Perfect for Make-Ahead or Brunch Prep: I often make the batter the night before and keep it in the fridge. The crepes cook up quickly in the morning, making brunch feel extra special without the stress.
  • A Family Tradition Worth Sharing: This is the recipe my mom used to make for us growing up, and now I get to make them for my own family, a lot like these Ukrainian Cheese Pancakes.
A hand drizzles honey over crepes made with an easy crepe recipe, topped with whipped cream and mixed berries on a white plate, with juice and fruit in the background.

If you enjoyed this recipe, please come back and give it a rating. I ❤️ hearing from you!

A table set with plates of tender crepes made using the easy crepe recipe, bowls of berries and jam, jars of honey and chocolate spread, and glasses of orange juice on a marble surface.

Ingredients

  • All-Purpose Flour – This gives the crepes structure while still keeping them tender and thin. It blends smoothly with the other ingredients to create a pourable batter.
  • Eggs – Eggs add richness and help bind the batter together so the crepes hold their shape and don’t tear.
  • Milk and Water – A combination of milk and water keeps the batter light. Milk adds a bit of creaminess, while water helps keep the crepes delicate.
  • Unsalted Butter – Melted butter adds flavor and ensures the crepes cook up tender with lightly crisp edges. It also helps prevent sticking.
  • Sugar and Vanilla Extract – Just a touch of sugar and vanilla brings subtle sweetness and makes the crepes versatile enough for sweet fillings.
  • Kosher Salt – A pinch of salt balances the sweetness and enhances all the flavors.

For full list of ingredients and instructions, see recipe card below.

Instructions

  1. Blend the Batter: Combine water, milk, eggs, flour, melted butter, sugar, salt, and vanilla in a blender. Blend for 15–20 seconds until smooth.
  2. Cook the Crepes: Lightly butter a pan over medium heat. Pour in ¼ cup batter, swirl to coat the pan, and cook for about 30 seconds per side until lightly golden.
  3. Repeat: Transfer cooked crepes to a plate, layering with parchment to prevent sticking. Repeat with remaining batter.
  4. Fill and Serve: Add your favorite sweet or savory fillings, fold or roll, and enjoy!

For full list of ingredients and instructions, see recipe card below.

A white oval plate with tender crepes, neatly folded and arranged in a fan shape, sits on a marble surface with a light pink cloth underneath.

Substitutions & Variations

Here are some of my favorite substitutions and variations:

  • Make It Sweet: I love filling these crepes with Nutella, jam, lemon curd, or fresh berries. Add a dusting of powdered sugar or a dollop of whipped cream for a pretty finish.
  • Go Savory: For a meal-style crepe, try ham, cheese, and arugula with a little mustard. Sautéed mushrooms, onions, garlic, dill, and a spoonful of sour cream also make a delicious filling.
  • Flavor the Batter: Vanilla extract gives a subtle sweetness, but almond extract, orange zest, or even a splash of rum can change up the flavor depending on your filling.
  • Top With Extras: After cooking, spread your filling and then add crushed nuts, chocolate shavings, or a drizzle of caramel or honey for extra texture and flavor.
Sliced, tender crepes made with the blend-and-pour method, filled with ham, topped with fresh arugula, served on a wooden cutting board against a light background.

What to Serve with Crepes

Sweet Breakfast Dishes

  • These easy crepes fit right in with sweet breakfast favorites. We love serving them alongside Fluffy Buttermilk Pancakes or a Croissant French Toast Bake for a brunch spread that feels special and a little indulgent.
  • They also pair well with overnight oats or a bowl of yogurt topped with granola and berries.

Savory Breakfasts

  • Crepes also pair beautifully with savory morning dishes. Try them served next to Turkish Eggs, Freezer Breakfast Sandwiches, or a plate of Smoked Salmon Eggs Benedict for a complete and satisfying brunch.

Other Sides

  • Crepes go perfectly with simple, colorful sides. We like offering a platter of fresh sliced fruit, a citrus salad with mint, or roasted breakfast potatoes.
  • They’re also nice with a small green salad dressed with lemon vinaigrette if you’re serving savory crepes for lunch or dinner.
  • If you’re setting up a brunch buffet, add a tray of caprese skewers or stuffed mini peppers for extra variety.
A plate of tender crepes made with the easy blend-and-pour method is topped with mixed berries, syrup, and cream, set on a light pink napkin alongside juice, jam, and extra berries on a marble surface.

FAQs

Can I make the batter ahead of time?

Yes. You can blend the batter and store it in the fridge for up to 2 days. Give it a quick stir or blend before cooking in case it separates.

Do I really need to let the batter rest?

Letting it rest for 20 to 30 minutes can help the flour absorb the liquid and relax the gluten, making the crepes lighter and more tender. But if you’re short on time, you can skip this step and they will still turn out delicious.

Why shouldn’t I overmix the batter?

Overmixing adds too much air which can create bubbles and give your crepes an uneven texture. Just blend until smooth and then stop.

What’s the best way to keep the crepes from sticking?

Make sure your pan is well greased. I like using melted butter, but cooking spray works too. Also, keep the heat at medium so the crepes cook evenly without burning.

How long do crepes keep?

Stack the cooled crepes with parchment paper in between, cover with plastic wrap, and store in the fridge for up to 3 days. Reheat gently in a skillet or microwave before serving.

A plate with a folded crepe made using the easy crepe recipe and blend-and-pour method, filled with cream and berry jam. Served with a black and gold fork and knife, plus a bowl of jam, honey, and a pink cloth napkin nearby.

More Brunch Recipes You’ll Enjoy

  • Strawberry Cream Cheese Stuffed French Toast – Spoil mom for Mother’s Day with this delectable Strawberry Cream Cheese Stuffed French Toast. It’s a super simple recipe and stuffed with all the flavors of spring.
  • Khachapuri (Georgian Cheese Bread) – Boat-shaped bread stuffed with three kinds of cheese, eggs, and butter, this scrumptious meal is sure to be the talk of the table.
  • Easy Keto Bacon Chaffles – These Keto Chaffles with bacon are crispy, cheesy, and packed with flavor! Made with a blend of three cheeses, they strike the perfect balance of crunchy, savory, and satisfying. 
  • Homemade Strawberry Pop-Tarts – When the nostalgia hits, turn to these Homemade Strawberry Pop-Tarts. A yummy treat, they’re easy to make and packed with fresh jam and a buttery crust.

If you try this recipe, let me know what you think! Rate and review this recipe in the comments below. Don’t forget to take a picture and tag me on Instagram @lenaskitchenblog!

Two tender crepes made with an easy blend-and-pour method are folded and topped with berries and cream, served on a plate beside a jar of jam, a glass of orange juice, and a bowl of mixed berries.
Print Recipe
4.89 from 45 votes

How To Make Easy Crepes

This Easy Crepe Recipe comes straight from my mom’s kitchen. I grew up eating these tender crepes, and now I love making them for my own family. Her simple blend-and-pour method makes them just right for sweet or savory fillings.
Prep Time5 minutes mins
Cook Time20 minutes mins
Total Time25 minutes mins
Course: Breakfast
Cuisine: French
Keyword: berries, breakfast, brunch, crepes, easy dessert, easy meal, mothers day, savory
Servings: 16 crepes
Calories: 92kcal
Author: Lena Gladstone

Equipment

  • crepe pan
  • rubber spatula

Ingredients

Easy Crepes

  • ½ cup lukewarm water
  • 1 cup milk
  • 5 large eggs
  • 1 cup all purpose flour
  • 4 tablespoons unsalted butter melted, plus a bit more to coat the pan
  • 2 tablespoons sugar
  • ¼ teaspoon kosher salt
  • 1 teaspoon vanilla extract

Instructions

  • Add all the ingredients to a blender and blend until combined (15 to 20 seconds). Alternatively, mix the wet ingredients in a large bowl, then add in the dry ingredients. Whisk until combined.
  • Lightly butter a medium sized frying pan with butter and set over medium heat to warm up.
  • Fill a ¼ cup with crepe batter and pour it into the warm skillet. As soon as the batter hits the center of the pan, lift the pan from the stove entirely and roll in a circular motion so the batter moves evenly around the skillet to form a circle.
  • Cook for about 30 seconds, or until the crepe begins to bubble around the edges and goes from gloss batter to a matte surface. Use a spatula to flip the crepe over and cook the other side for around 30 seconds.
  • Transfer the crepe to a plate. Repeat the same method with the rest of the batter. I like to keep parchment paper over each finished crepe so the edges don’t dry out.
  • Fill your crepes with your favorite fillings and toppings. I like to add ham, cheese, mustard, and arugula to savory crepes, and Nutella and berries or lemon curd and berries for sweet crepes.

Notes

  • Don’t overmix the crepe batter. Too much air in the batter can create bubbles that lead to a strange texture. Blend or whisk just until the batter is smooth and then stop.
  • You can make the batter ahead of time and store it in the refrigerator for up to 2 days. Give it a quick stir before cooking if it has separated.
  • Many recipes recommend letting the batter sit for 20 to 30 minutes after blending. This helps the flour absorb the liquid and allows the gluten to relax, resulting in lighter, more tender crepes. However, this step is optional, and your crepes will still turn out delicious even if you skip it.
  • When making crepes ahead, stack them with a piece of parchment paper between each one and cover with plastic wrap so they stay soft and do not dry out.
  • Always lightly butter or grease the pan before adding batter to keep the crepes from sticking or tearing.
  • Pour the batter into the center of the hot pan, then quickly lift and swirl to spread it evenly into a thin circle.
  • Cook each crepe until the edges turn matte and small bubbles form, then flip and briefly cook the other side.
  • Crepes are wonderfully versatile. Try filling them with Nutella, jam, lemon curd, or berries for a sweet treat, or with ham, cheese, mustard, and arugula for a savory option.
  • They’re also delicious with sautéed mushrooms, onions, garlic, dill, and a little sour cream.
  • Leftover crepes keep well in the refrigerator, covered, and can be gently reheated in a pan when ready to serve.
 
If you enjoyed this recipe, please come back and give it a rating. I ❤️ hearing from you! 

Nutrition

Serving: 0g | Calories: 92kcal | Carbohydrates: 8g | Protein: 3g | Fat: 5g | Saturated Fat: 3g | Polyunsaturated Fat: 0.5g | Monounsaturated Fat: 1g | Trans Fat: 0.1g | Cholesterol: 67mg | Sodium: 65mg | Potassium: 54mg | Fiber: 0.2g | Sugar: 2g | Vitamin A: 197IU | Calcium: 30mg | Iron: 1mg

You might also like:
Three glass jars filled with granola are arranged on a table with loose granola pieces and small white flowers nearby.Maple Granola Recipe
Syrniki (Ukrainian Cheese Pancakes)
These Fluffy Buttermilk Waffles are not your average waffles! Easy to make with 8 simple ingredients, this epic breakfast has an upgraded flavor and texture to help the meal feel extra special.Buttermilk Waffles Recipe
Puff Pastry Quiche Recipe
Glass jars filled with chia pudding topped with blackberries, blueberries, and a raspberry, with a gold spoon and a mint leaf for garnish.Overnight Chia Seed Pudding
A slice of baked oatmeal with blueberries on a white plate, garnished with more blueberries and a dollop of cream, with a fork holding a piece.Healthy Baked Oatmeal
Three golden-brown apple turnovers on a white plate, surrounded by apple slices, a cup of milk, a bowl of sugar, and additional turnovers on a cooling rack.Apple Turnovers with Puff Pastry
Tater Tot Breakfast Casserole Recipe

Potato Vareniki (Ukrainian Pierogi Recipe)

Posted: March 1, 2022 by lena gladstone | Updated: March 2, 2022

Potato Vareniki (Ukrainian Pierogi Recipe) are one of the best and most comforting Eastern European dishes. Stuffed with mashed potatoes and wrapped in homemade dough, they’re easy to love by both adults and kids!

Jump to Recipe
dumplings topped with bacon, sour cream and onions in a black bowl with a fork

Potato perogies from Ukraine

Unsure of how to use up the leftover mashed potatoes in your fridge? This Potato Vareniki recipe is the perfect solution!

This Ukrainian pierogi recipe features fluffy and creamy mashed potatoes stuffed inside a homemade dough. The pierogies are quickly boiled and served with plenty of sour cream, caramelized onions, and dill on top. It’s the ultimate comfort food!

This recipe was shared with me by my friend Marina McAvoy, her mom’s recipe is so delicious.

dumplings topped with bacon, sour cream and onions in a black bowl with a fork

Vareniki vs. pierogi vs. pelmeni

All three of these dumpling recipes are popular throughout Ukraine, Russia, and Eastern European countries. Each one features a filling wrapped in dough, but have a few key differences:

  • Both vareniki and pierogi are dumplings stuffed with potatoes. The words mean the same thing, with vareniki being popular in Russia and Ukraine and pierogi used further west, like in Poland. The dumplings are boiled or fried and traditionally served with sour cream, bacon, onions, or herbs on top.
  • Pelmeni is quite similar but filled with raw meat instead of potatoes. The meat cooks inside of the dough while the pelmeni boils or fries.
ingredients in bowls

What are vareniki made of?

  • Vareniki dough – This simple dough recipe is easy to make using your average bread dough ingredients: flour, milk, butter, and eggs.
  • Mashed potato filling – The filling is just as easy to make as traditional mashed potatoes! All you need are Russet potatoes, whole milk, butter, salt, and a bay leaf for flavor. The filling is easy to customize with all kinds of flavor enhancers, which I’ve included below.
step by step showing how to make a Pierogie dough

How to make vareniki dough

  1. Heat the milk and butter: Add the milk and butter to a pot over low heat and heat until the butter melts. Set it aside to cool.
  2. Mix the ingredients: Whisk the flour, salt, and egg together in a bowl. Slowly add in the cooled milk and butter mixture and stir together.
  3. Knead the dough: Transfer the dough to a lightly floured surface and knead. Cover it with a damp kitchen towel and let it rest.
  4. Roll out and cut the dough: Divide the dough and roll each piece out on a floured surface. Cut into round shapes, then repeat until you run out of dough.
step by step showing how to make a Pierogies

How to make Ukrainian vareniki

  1. Make the potato filling: Cook the peeled and chopped potatoes and bay leaves in a pot of boiling water until they’re soft. Drain, discard the bay leaves, and add the butter and milk into a pot. Mash the potatoes until they’re smooth.
  2. Assemble the vareniki: Place ½ tablespoon of potato filling onto the middle of each round piece of dough. Fold the dough over and pinch to seal so you end up with a half moon shape. 
  3. Cook the vareniki: Bring a large pot of water to a boil and add the vareniki. Take them out of the water once they float to the top and cook for 3-5 more minutes. Toss them in a bowl with melted butter, then serve with sour cream and any other toppings you love!

Expert recipe tips

  • ​​This recipe makes 55-60 pierogies, based on how thinly you roll the dough.
  • If the dough is not thin enough, the vareniki will be pasty. The dough can be passed through a pasta roller to have an even thinner roll.
  • Is your dough too sticky? Add a little bit of flour while you knead until it comes together.
  • Use a wine glass, water glass, or round cookie cutter to cut out the dough.
a baking sheet with raw Pierogies on flour

Vareniki filling ideas

The beauty of a vareniki recipe is that it can be filled with both savory and sweet fillings:

Savory filling ideas

Take your potato filling up a notch and stir in: 

  • Cooked bacon
  • Caramelized onions
  • Sauerkraut
  • Sauteed onions
  • Farmer cheese
  • Shredded cheese
  • Cabbage
  • Peas
  • Ground meat

Sweet filling ideas

Vareniki can even be served for dessert! Swap the mashed potatoes for soft cheese (like cottage cheese or farmer cheese) and berries with a little bit of sugar. If the cheese is too heavy on its own, you can lighten it up with a little sour cream or plain Greek yogurt.

round back bowl filled with dumplings topped with bacon and onions, fork piercing dumplings

Serving suggestions

Once the perogies are cooked, they can be served right away with sour cream, dill, bacon, caramelized onions, or green onions on top. They can even be fried in a skillet with some oil to give the outside a nice crisp edge!

Frequently asked questions

Why are my perogies falling apart?

This can happen if the seal isn’t tight enough. Once you pinch the dough closed, try crimping the edges with a pinch and twist motion.

How do you know when perogies are cooked?

You’ll know the perogies are ready when they float to the top in the pot of boiling water.

Can you use leftover mashed potatoes?

Yes! You can stir sour cream or cream cheese into the refrigerated potatoes (omit the butter) to help soften them. Just make sure they aren’t too soft or creamy.

dumplings topped with bacon and onions in a black bowl with a fork

How to store vareniki

  • Store: Cooked vareniki can be stored in an airtight container in the fridge for up to 1 week.
  • Freeze: Lay the assembled, uncooked vareniki on a parchment paper-lined or floured baking sheet and freeze. Once they’re frozen solid, transfer them to a freezer bag. They’re easy to cook from frozen in boiling water.
  • Reheating: Leftover cooked perogies can be reheated in the microwave or in a skillet with a little butter.

More Ukrainian recipes to try:

  • Ukrainian Cheese Pancakes (Syrniki)
  • Classic Ukrainian Red Borscht
  • How To Make Easy Crepes

If you give this Potato Vareniki recipe a try, let me know in the comments below. I love seeing your pictures too, so please tag me on Instagram @lenaskitchenblog and use #lenaskitchenblog so I can share them to my page!

Print Recipe
4.16 from 58 votes

Potato Vareniki (Ukrainian Pierogi Recipe)

Potato Vareniki (Ukrainian Pierogi Recipe) are one of the best and most comforting Eastern European dishes. Stuffed with mashed potatoes and wrapped in homemade dough, they’re easy to love by both adults and kids!
Prep Time1 hour hr
Cook Time20 minutes mins
Total Time1 hour hr 20 minutes mins
Course: Dinner, Lunch, Main Course
Cuisine: Russian, ukrainian
Keyword: dinner, homemade dough, mashed potatoes, potatoes, ukranian food, weeknight dinner
Servings: 12 servings
Calories: 400kcal
Author: Lena Gladstone

Ingredients

Vareniki Dough

  • 2 cups whole milk
  • ½ cup unsalted butter 1 stick
  • 4 cups all-purpose flour plus more for rolling
  • 1 egg
  • 1 teaspoon kosher salt

Potato Filling

  • 4 large russet potatoes peeled and quartered
  • 6 tablespoons unsalted butter
  • kosher salt for water to taste
  • 2 bay leaves
  • ¼ cup whole milk

To Serve

  • unsalted butter
  • sour cream
  • fresh dill or green onions
  • caramelized onions optional
  • crispy bacon optional

Instructions

Potato Filling

  • Bring a large pot to a boil, salt with water to taste. Peel the potatoes and cut into quarters. Add to water along with bay leaves and cook uncovered on medium heat until fork tender. About 10-12 minutes.
  • Remove from heat, drain water and remove bay leaves.
  • Add butter and mash until smooth. Add milk and using a spoon whip the potatoes until combined.

Make Vareniki

  • Add milk and butter pieces into a pot and heat until butter melts on low heat. Mix to combine. Let cool for 5 minutes.
  • In a bowl add flour, salt and 1 egg, whisked. Slowly add in the slightly cooled milk and butter mixture. Stir to combine.
  • Once dough is formed, add some flour on your countertop and knead the dough for 2-3 minutes.
  • Set the dough aside and cover to rest for 10 minutes.
  • Once you are ready to make your first batch of vareniki, divide your dough into 3 pieces. Cover the pieces you aren’t using.
  • Roll out the dough thinly on a floured surface to just under 1/8” thickness. Using either glass or a 3 inch cookie cutter, cut out round shapes. Keep the shapes as close as possible, keeping the scraps (add them to the unused dough to reuse).

Assemble Vareniki

  • Add 1/2 Tbsp of potatoes over each round piece of dough, fold over in half and pinch together to seal and make a half moon shape. To ensure a tight seal, crimp the edges a second time with a pinch and twist motion.
  • Place the prepared vareniki on a floured baking sheet to prevent sticking.

Freezing Vareniki

  • If making ahead, you can freeze them and once frozen on the floured baking sheet, add to a freezer bag and store until ready to use.

Cooking Vareniki

  • Bring a large pot of water to a rolling boil and add kosher salt to taste. Carefully add fresh or frozen vareniki once water has boiled.
  • Cook for about 10-12 minutes, then once the vareniki are floating and water is back to a boil, the dough should be very tender. Carefully remove to a bowl with a slotted spoon. Add butter and gently toss to combine. Add to a bowl, top with sour cream and fresh dill or green onions and enjoy. Or kick it up a notch and cook up some caramelized onions and bacon to add as a topping along with sour cream and fresh herbs.

Notes

  • This recipe makes 55-60 pierogi, based on how thinly you roll.
  • The preparation of vareniki requires a little time and a few tricks:
  • The vareniki dough should not be too thick. Indeed, if the dough is not sufficiently rolled thinly, the vareniki will be pasty. The dough can be passed through a pasta roller to have an even thinner roll.

Nutrition

Calories: 400kcal | Carbohydrates: 56g | Protein: 9g | Fat: 16g | Saturated Fat: 10g | Polyunsaturated Fat: 1g | Monounsaturated Fat: 4g | Trans Fat: 1g | Cholesterol: 54mg | Sodium: 227mg | Potassium: 627mg | Fiber: 3g | Sugar: 3g | Vitamin A: 507IU | Vitamin C: 7mg | Calcium: 80mg | Iron: 3mg

You might also like:
Baked chicken kabobs on a plate.Baked Chicken Kabobs
Italian stuffed peppers on plate with a side salad.Italian Stuffed Peppers Recipe
Grilled chicken thighs on a plate.Grilled Cilantro Lime Chicken Thighs
Miso glazed salmon bites.Miso Glazed Salmon Bites
Ground Chicken Burgers (Extra Juicy)
Panko Crusted Salmon
Chicken Meatballs and Orzo
One Pot Beef Stroganoff Recipe

How To Build A Russian Charcuterie Board (Video)

Posted: December 29, 2021 by lena gladstone | Updated: January 24, 2022

Learn How To Build A Russian Charcuterie Board using this detailed guide and video! The bright and hearty flavors, variety of colors, and diverse ingredients make this the ultimate crowd-pleasing snack board!

Jump to Recipe
overhead view of sliced meats, cheeses, vegetables, bread, pickled vegetables, and sauces on a large wood board.

Take your friends and family on a trip to Russia right in the comfort of your kitchen! Learn How To Build A Russian Charcuterie Board filled with rich, tangy, and hearty appetizers (“zakuski” in Russian). The diverse elements and bold flavors are guaranteed to be a hit at any party or get-together.

Russia has a lot to offer when it comes to finger foods, appetizers, and side dishes. While this board primarily features Russian and Ukrainian elements, there is a sprinkle of French and Italian snacks throughout. In other words, there’s something for everyone!

Youtube video

Make all of your guests happy with even more charcuterie boards! My Holiday Charcuterie Board and Epic Charcuterie Board For Two are always the highlight of the party.

overhead view of sliced meats, cheeses, vegetables, bread, pickled vegetables, and sauces on a large wood board.

What is a charcuterie board?

Charcuterie (pronounced “shahr-ku-tuh-ree”) is the French word for cured meats, such as bacon, salami, and prosciutto. It’s associated with assembling meat products together with other accompaniments, such as vegetables, dried fruits, nuts, and cheeses. When you hear “charcuterie board”, you should instantly think of a beautiful presentation and refined flavors.

What you need to create an authentic Russian charcuterie board

Think of colors and shapes when putting this board together. You can have your guests grab little pieces or set it up as a sandwich-building station. The only rule is to have fun and get creative with each element:

5 different kinds of cheese on a piece of white parchment paper.

Cheese

There’s ample opportunity to get creative when it comes to cheese! Choose a few varieties with all different flavors, textures, and milk (like cow, sheep, or goat’s milk) if you want or stick with your favorites.

Not sure how much cheese to buy? Aim to serve 2 to 3 ounces of cheese per person. Pick a few high-quality hard and soft cheeses from your local deli or grocery store.

All of these cheeses pair well with the Russian flavors:

  • Gouda (smoked or regular)
  • Jarlsberg cheese (Swiss works too)
  • Havarti cheese
  • Feta
different kinds of sliced meats and cured sausages on a white piece of parchment paper.

Meat

Salty and savory sliced charcuterie meats are a must on any meat and cheese board. You can play around with many different types and flavors depending on how many guests you’re expecting.

Because sliced meats are one of the board highlights, get creative with the presentation. I like to create rosettes and folds so the meat not only looks amazing but is easy to grab. 

Head to your local Russian or European store and look for different shapes and sizes of meats. Have them sliced very thinly so they can be picked up easily or layered on a sandwich. If you’re using polish-style sausage and cured and salted pork fat (salo), keep them in the freezer and slice it yourself with a sharp knife before serving.

Any of these meats would be delicious:

  • Salami
  • Smoked sausage
  • Polish sausage
  • Cured and salted pork fat (served with sliced garlic cloves)

Brined and cured fish is also a popular choice in Russia. Feel free to swap one or two types of sliced meat for:

  • Caviar
  • Cured salmon (lox)
  • Pickled herring
jars of pickles and pickled vegetables.

Pickled vegetables

There’s a lot of tang on this board and for good reason! The bright flavors from pickled vegetables add another layer of depth to each sandwich or bite of salty meat. Plus, it just wouldn’t be a Russian snack board without a variety of pickled items.

I like to use smaller pickled items so everything on the board is bite-sized:

  • Red onions
  • Dill pickles
  • Mushrooms
  • Cornichons
  • Olives
  • Tomatoes
  • Radishes
  • Pattypan squash
  • Cabbage

Spreads and dips

A tangy mix of Russian dips and spreads will really round out every bite. I like a variety of mustards (especially for sandwiches) but there are endless options you can include:

  • Spicy mustard
  • Grainy mustard
  • Horseradish
  • Sauerkraut
  • Mayonnaise

Bread

Dark and rich-tasting bread is perfect for building a Russian sandwich or to hold your meat, cheese, and mustard. Crackers work well too, but bread is the real star when you’re aiming for hearty, warming bites.

Rye bread is very popular in Russia and it pairs perfectly with salty meats and mustards. You can use just one type of bread or a variety depending on what you or your guests like:

  • Rye bread
  • Baguette
  • Wheat bread
  • Sourdough
  • Pretzel bread
overhead view of sliced meats, cheeses, vegetables, bread, pickled vegetables, and sauces on a large wood board.

Extras

These extras are great for adding color, contrast, and flavor to your board. You can use anything from fresh herbs, vegetables, crackers, more bread, or decorative items to make it visually appealing. Just make sure they fit with the Russian theme!

Vegetables:

  • Cucumber
  • Radishes
  • Tomatoes
  • Garlic

Herbs:

  • Dill
  • Parsley
  • Cilantro
  • Green Onions

Other:

  • Crackers
  • Crostini
  • Nuts

How to assemble a Russian charcuterie board

You’ll need a few tools to set up your board, which you can see below. Once all of your elements are prepped and ready, follow these tips and tricks to assemble your Russian-themed charcuterie board:

  1. Prepare each item.

    Slice the meats, hard cheeses, and bread so everything is easy to grab. Make sure to slice the garlic cloves and place them on a small plate with the sliced salo (cured pork fat). Place the pickled items and spreads into small bowls

  2. Add the cheese.

    Place the cheeses close to the corners of the board. This will make it easier for your guests to grab a slice or cut it themselves with a cheese knife if necessary.

  3. Add the meats and mustard.

    Next, place the sliced meats near the cheeses. Make sure the small bowls with mustard are close by as all 3 go so well together. Don’t forget about the plate with the pork fat and garlic!

  4. Add the rest.

    Lay the cucumbers and any other fresh vegetables onto the board. Add bowls of pickled vegetables around, then fill the gaps with sliced bread.

  5. Fill in the gaps.

    If your board has empty gaps, you can fill them with green onions, fresh dill, crackers, radishes, or other decorative items.

womans hands picking up sliced meat from a platter of meats, cheeses, vegetables, bread, pickled vegetables, and sauces on a large wood board.

Tools and equipment needed

  • Serving board: The size of the charcuterie board will depend on how many people you’re serving. Use a large marble or wood slab, a ceramic serving plate, or a regular dinner plate.
  • Bowls: Grab some small bowls or ramekins for the pickled items, vegetables, mustard, and any other dips and spreads you’ll be serving.
  • Cutlery: Put out cheese knives, forks or toothpicks for picking up items, and place small spoons in the bowls with anything that can’t be picked up by hand.

Preparing a charcuterie board ahead of time

Assemble your board without the bread, fresh vegetables, or herbs a few hours before guests arrive. Wrap it in plastic and keep it in the fridge. Remove the board 30 minutes before serving so the cheese has time to come down to room temperature. 

overhead view of sliced meats, cheeses, vegetables, bread, pickled vegetables, and sauces on a large wood board.

More Russian recipes to try

  • Herring Under Fur Coat Salad
  • Chebureki with Beef and Pork
  • Classic Ukrainian Red Borscht
  • Easy Olivier Salad

If you follow these tips and make your own Russian-inspired charcuterie board, let me know! Leave a comment below, and don’t forget to take a picture and tag it with #lenaskitchenblog on Instagram. I love seeing what you come up with!

Print Recipe
4.75 from 4 votes

How To Build A Russian Charcuterie Board

Learn How To Build A Russian Charcuterie Board using this detailed guide. The bright and hearty flavors, variety of colors, and diverse ingredients make this the ultimate crowd-pleasing snack board!
Prep Time15 minutes mins
Cook Time15 minutes mins
Total Time30 minutes mins
Course: Appetizer, Party Food, Snack
Cuisine: French, Italian, Russian
Keyword: appetizer, charcuterie, cheese, easy appetizer, healthy snack, holiday party, meat, party, party food, russian food, snack, ukranian food
Servings: 8 servings
Calories: 687kcal
Author: Lena Gladstone

Ingredients

  • ½ pound smoked gouda cheese cubed
  • ½ pound Jarlsberg cheese or Swiss cheese
  • ½ pound gouda sliced into thicker pieces
  • ½ pound havarti cheese cubed
  • ¼ pound hard salami thinly sliced
  • ¼ pound smoked sausage sliced
  • ½ pound polish sausage sliced
  • 4 sticks sticks skinny smoked sausage cut into 1” pieces
  • ¼ pound cured pork fat or also called salo, frozen and sliced thinly
  • 1 cup small dill pickles halved
  • 1 cup small pickled tomatoes
  • 1 cup small pickled pattypan squash halved
  • 1 bunch radishes halved
  • 3 persian cucumbers sliced
  • ½ bunch fresh dill
  • 1 bunch green onions
  • 4 cloves garlic peeled and trimmed and thinly sliced
  • 2 tablespoons spicy mustard
  • 2 tablespoons grainy mustard
  • 1 rye bread sliced into small pieces or use baguette

Instructions

  • Prepare the meats and cheeses.
  • Add small bowls filled with pickled items on the board, creating a triangle.
  • Thinly slice the cured pork fat (salo). Then thinly slice the garlic. Add to a small plate.
  • Prep the green onions by trimming the bottoms and cut the white part and green part in half.
  • Slice the bread. You can use dark rye bread or a baguette.
  • Start building the board by adding the cheeses first.
  • Now add the meats near the cheeses. Add the mustards near the meat in small bowls.
  • Add the plate of pork fat and garlic to the board.
  • Add in the cucumbers and halved radishes.
  • Add the bread to fill in the spots.
  • Fill in with dill and green onions on the board. Enjoy!

Video

Youtube video

Notes

You can store the meats and cheeses in separate containers in the refrigerator.

Nutrition

Calories: 687kcal | Carbohydrates: 7g | Protein: 40g | Fat: 56g | Saturated Fat: 28g | Polyunsaturated Fat: 3g | Monounsaturated Fat: 18g | Trans Fat: 1g | Cholesterol: 162mg | Sodium: 1897mg | Potassium: 425mg | Fiber: 1g | Sugar: 3g | Vitamin A: 1038IU | Vitamin C: 9mg | Calcium: 805mg | Iron: 1mg

You might also like:
Beef Carpaccio Recipe
A pile of savory pastry pinwheels garnished with herbs on a white surface, next to a knife, parsley sprigs, and a small bowl of dark dipping sauce.Ham and Cheese Puff Pastry Pinwheels
Hands pulling apart a round loaf of bread filled with melted cheese and herbs on a white plate, with ingredients like garlic and parmesan nearby.Cheesy Garlic Pull Apart Bread
A hand holds a piece of toasted bread topped with cheese and fresh fig, with more similar brie and fig crostini arranged on a white platter.Brie and Fig Crostini
Bacon-wrapped dates stuffed with cheese on a plate, with honey being drizzled over them using a honey dipper.Bacon Wrapped Dates with Goat Cheese
Puff pastry brie bites being drizzled with honey.Puff Pastry Brie Bites
A stack of golden-brown zucchini fritters topped with a dollop of sour cream and a sprig of dill, served on a white plate with green garnish.Zucchini Fritters Recipe
Smoked Fish Dip Recipe

Uzbek Beef Plov (Beef Rice Pilaf Recipe)

Posted: November 29, 2021 by lena gladstone | Updated: January 10, 2025

This ​​Uzbek Beef Plov (Beef Rice Pilaf Recipe) is just like traditional rice pilaf, but better! Tender beef, rice, spices, and veggies are cooked together in one pot. It’s a comforting and delicious meal that’s perfect for feeding a crowd!

Jump to Recipe
large brown bowl filled with cooked yellow rice, carrots, and beef.

Uzbek beef plov recipe

If you want to make your entire family happy, then you have to serve them this Uzbek Beef Plov! Similar to a traditional rice pilaf, this beef pilaf recipe is made with seared beef, vegetables, garlic, and spices to take the flavors to new and delicious levels. The best part is it’s cooked all together in one big pot.

You don’t even need any complicated ingredients to make meat pilaf at home! All you need is beef chuck (or sirloin or lamb – your choice!), medium-grain rice, a few veggies, and simple spices. It’s delicious with pickled vegetables on top and a scoop of radicchio Caesar salad on the side.

Tools for Uzbek Beef Plov Recipe

  • Dutch Oven or this dutch oven
  • Cutting Board
  • Sharp Knife
  • Spatula
  • Measuring Spoons
  • Measuring Cup
close up on a black bowl filled with cooked yellow rice, carrots, and beef.

Most Uzbek, Russian, and Ukrainian families have their own version of a beef plov recipe and my family is no different! While this version was inspired by my brother-in-law’s recipe, I added a few of my own touches to make it extra special. I know you and your family will love it as much as mine!

large brown bowl filled with cooked yellow rice, carrots, and beef.

What is beef plov?

Beef plov is a one-pot Uzbek dish made with rice, beef, carrots, onions, garlic, and spices. While it’s a traditional Uzbek dish, it’s also popular among Russian and Ukrainian families. It’s a total comfort food designed to feed a lot of people, making it the perfect family-friendly recipe!

individual bowls filled with raw beef, carrots, onions, rice, oil, and seasonings.

What’s the best rice for plov?

I prefer using Calrose medium-grain rice for this plov. Some recipes call for basmati or jasmine too, cooking times on that rice will vary though.

large white bag of calrose rice.

Beef rice pilaf ingredients

  • Beef – Beef chuck, sirloin, or short ribs, or lamb works the best. The meat is cut into 1 inch pieces and seared before it’s cooked with the veggies and rice in a dutch oven. Each piece becomes so tender and juicy in the end.
  • Rice – A medium grain rice is best for this pilaf recipe. I like to use Calrose rice.
  • Vegetables – Carrots and onions are sauteed along with the meat while a full head of garlic is tucked into and cooked with the rice.
  • Spices – All you need is cumin, turmeric, and salt.
4 images showing the process of chopping carrots, preparing rice, diced onions, and sauteeing beef in a black skillet.

How to make Uzbek beef plov

This one-pot recipe makes plenty for everyone! Once the beef is tender and the rice is cooked, you can dig into the easy Uzbek plov:

  1. Rinse the rice.

    Add the rice to a fine-mesh strainer and rinse under cold water until the water is coming out clear. Once that’s done, place the rice in a bowl with water.

  2. Sear the beef.

    Heat the oil in a dutch oven or heavy-bottomed pot over high heat and add the seasoned beef. Sear until all sides are brown.

  3. Saute the vegetables and spices.

    Turn down the heat, then add the onions and cook until they’re soft. Stir in the carrots and spices. Pour the water into the pot and add salt. Add a lid on top of the pot and simmer.

  4. Cook the rice.

    Pour the rice into the pot and tuck the garlic head in the center. Cover the pot with the lid and cook. Don’t stir or fluff the rice until you think it’s ready to eat.

  5. Serve and enjoy!

    Once it’s ready, take the head of garlic out of the pilaf and fluff the rice with a fork. Stir everything together, then serve!

4 images showing the process of cooking beef, vegetables, stock, and rice in a large black pot.

Tips and tricks

  • It’s crucial to rinse the rice first! This will remove all of the starch so you don’t end up with a gummy pilaf.
  • Always preheat your dutch oven or pot first so the meat can cook and tenderize evenly. If you add the meat before the oil and pot is not hot, all of the delicious juices will seep out and dry out the meat.
  • Cook the rice in heavily salted water so it absorbs as much flavor as possible.
  • DO NOT stir or fluff the pilaf as it cooks.
  • Beef pilaf is extra delicious served with pickles and pickled vegetables (like radishes and red onions)!

Storing and freezing leftovers

To store, keep the leftover pilaf in an airtight container in the fridge for up to 1 week.

To freeze, place the leftovers in a freezer-safe bag or sealed container. It freezes well for up to 3 months. 

To reheat, add the leftover beef pilaf to a skillet over medium heat until warmed through. But popping it in the microwave is ok too.

More one pot dinner recipes

  • Mediterranean Chicken and Orzo
  • Creamy Chicken and Gnocchi
  • Instant Pot Cheeseburger Soup
  • Greek Chicken Thighs with Potatoes
close up on a large brown bowl filled with cooked yellow rice, carrots, and beef.

More popular Russian and Ukrainian family recipes

  • Classic Ukrainian Red Borscht (Beet Soup)
  • Easy Olivier Salad
  • Ukrainian Cheese Pancakes
  • Easy Chebureki with Beef and Pork
  • Russian Herring Under Fur Coat Salad

Did you try this Uzbek Beef Plov (Beef Rice Pilaf Recipe)? Let me know what you think by leaving a comment below and giving this recipe a rating! Don’t forget to take a picture tag me on Instagram or use #lenaskitchenblog to be featured in my stories! I love seeing what you come up with!

Print Recipe
4.42 from 55 votes

Uzbek Beef Plov (Beef Rice Pilaf Recipe)

This ​​Uzbek Beef Plov (Beef Rice Pilaf Recipe) is just like traditional rice pilaf, but better! Tender beef, rice, and veggies are cooked together in one pot. It’s a comforting and delicious meal that’s perfect for feeding a crowd!
Prep Time15 minutes mins
Cook Time1 hour hr 30 minutes mins
Total Time1 hour hr 45 minutes mins
Course: Dinner, Main Course, Side Dish
Cuisine: Russian, Ukranian
Keyword: beef, dinner, main course, main dish, rice, russian food, side dish, sides, ukranian food, weeknight dinner
Servings: 10 servings
Calories: 628kcal
Author: Lena Gladstone

Ingredients

  • ½ cup avocado oil or canola oil
  • 3 lbs beef chuck or use beef sirloin or lamb, cut into 1 inch cubes
  • 1 small onion finely chopped
  • 6 large carrots peeled and cut into thicker matchsticks
  • 3 tablespoons cumin
  • 1 teaspoon turmeric
  • 1 ½ tablespoons kosher salt or more to taste
  • 6 cups hot water
  • 3 cups medium grain rice Calrose rice is what I use, rinsed
  • 1 head garlic keep whole, peel back the layer until you have one-two layers

Instructions

  • Before you do anything, rinse the rice until the water is clear. Then add water into the bowl and let it sit while you prep the rest of the ingredients.
  • Prepare the carrots by cutting them on an angle and then into thicker matchsticks, about ½ inch thick.
  • Cut the onions into a small dice.
  • Cut the beef chuck and cut into 1″ pieces. Pat it dry with a paper towel (this will help with the browning of the meat). Season with salt on all sides and set aside.
  • Preheat a large heavy-bottomed 6-quart or larger dutch oven to high heat. Once it's hot, add in your oil. Once the oil is hot, add in the cubed meat and sear for 5-7 min over high heat until meat is browned, stirring every minute or so so it doesn't burn to the bottom of the pot. Note: it's so important to preheat the dutch oven first for the meat to brown over high heat, otherwise it will release its juices and dry out the meat.
  • Turn down the heat to medium, add in the onions and saute for 3-5 minutes, until they become translucent.
  • Add in the carrots and saute for an additional 2-3 minutes.
  • Add in the spices and salt (adjust seasoning as needed per taste), mix well to combine.
  • Add 6 cups of hot water. Note: The goal is for the water to be a bit saltier than you think you need, the rice will absorb a lot of the salt and will help to season it. This is when you taste and see if you’d like any additional seasoning.
  • Bring back to a boil, then turn the heat to low, cover with a lid and let the meat and veggies cook for 25-30 minutes.
  • Remove the lid, add in the rice, making sure to spread it evenly. Note: DO NOT stir the pilaf.
  • Add a whole garlic head into the rice, make sure to tuck it in. Note: Peel back most of the layers until you only have 1-2 layers left. Make sure to clean off any of the dirt on the bottom and you can cut off the top a bit or leave it whole. You can clean the garlic to peel easier underwater.
  • Cover with the lid, turn the heat to low, and cook covered for 30-40. You can open and check the rice at 30 minutes, but do not fluff the rice until you are ready to eat. If the rice still needs a few minutes, cover and cook for an additional 5-10 minutes.
  • Once pilaf is done, remove from heat, remove the head of garlic and set aside, and gently fluff the rice and mix it in with the veggies and meat. Serve with pickled veggies and cooked garlic cloves. You can also add a side salad too.

Nutrition

Calories: 628kcal | Carbohydrates: 63g | Protein: 32g | Fat: 27g | Saturated Fat: 8g | Polyunsaturated Fat: 3g | Monounsaturated Fat: 16g | Trans Fat: 1g | Cholesterol: 94mg | Sodium: 1198mg | Potassium: 703mg | Fiber: 4g | Sugar: 2g | Vitamin A: 7258IU | Vitamin C: 4mg | Calcium: 68mg | Iron: 7mg

You might also like:
Grilled Skirt Steak
A plate with ground beef, lettuce, tomato, avocado, pickles, French fries, and onions, topped with a light sauce. Extra toppings, fries, and sauce are on the side.Burger Bowl Recipe
Plates of shrimp boil with corn on the cob, potatoes, sausage, shrimp, lemon wedges, and parsley, arranged on a white surface.Sheet Pan Shrimp Boil
Sheet pan chicken parmesan topped with melted cheese and tomato sauce on plates, served with spaghetti, marinara sauce, grated cheese, and a side of mixed greens.Sheet Pan Chicken Parmesan
Tomato Bisque Soup Recipe
A plate of mashed potatoes, green beans, and beef with mushroom sauce, next to two glasses of red drink. A hand is holding a fork and knife, cutting into the food.Beef Tenderloin with Mushroom Sauce
Chicken Pot Pie with Puff Pastry
Sliced roasted turkey with herbs, lemon wedges, and onions on a platter, surrounded by mashed potatoes, green beans, salad, and gravy on a table.Thanksgiving Dinner Ideas

Classic Ukrainian Red Borscht (Beet Soup)

Posted: September 24, 2020 by lena gladstone | Updated: September 29, 2020

You’re going to feel warm and comforted after a bowl of this Classic Ukrainian Red Borscht (Beet Soup)! This flexible and frugal recipe is made with heaps of vegetables and a homemade beef broth. It’s the best healthy meal for those chilly days!

Jump to Recipe
Woman's hands on a bowl of red beet borscht soup with a dollop of sour cream on top

I’m so happy to be sharing with you my mom’s recipe for Classic Ukrainian Red Borscht (Beet Soup)! This is a dish that will comfort you, fill you with warmth, and make you feel good all over.

Not only is this beet soup beautiful to look at with its ruby red color, but it’s also very good for you. Healthy and nutritious, you can find protein, iron, vitamins C and B6, fiber, and so much more in just 1 bowl. It’s a plant-focused recipe with a hearty, homemade beef broth.

This is a wonderful meal you can eat right away or store it for lunches and leftovers. You’ll definitely want to pack away an extra batch of the broth to enjoy on its own!

What is borscht?

Classic red borscht originated in Ukraine but is also very popular in Russia. It’s a beet-based soup that’s combined with any vegetables you have around the house or in the garden, and a hearty beef stock. It’s a great recipe when you’re working with a budget or need a little flexibility.

You can make borscht with beets and any other vegetables or stock you have at home. I prefer beef broth, potatoes, and cabbage in my beet soup, but feel free to add anything you like. This recipe is all about staying frugal and flexible.

Various soup ingredients in individual bowls

Ingredients you need

Throw whatever you have on hand into this traditional borscht or follow the recipe to a tee. As long as you have the beets for that red hue, you’re good to go!

This is what you need:

  • Beef shanks
  • Onion and garlic
  • Bay leaf
  • Carrots and parsnip
  • White cabbage
  • Yukon gold potatoes
  • Celery
  • Red bell pepper
  • Beets
  • Tomatoes
  • Great northern beans
  • Ketchup
  • Parsley

Choose the right beef

Making your own beef broth will give the soup the best flavor, so it’s important to choose the right kind of beef. I prefer to use beef shanks or beef short ribs, but sirloin and stew meat will also work.

If the beef has a bone in it, place the entire piece in the water. After it cooks, remove it from the broth, cut the meat away, and discard the bone. Cut the meat into 1” pieces or, if using sirloin or stew meat, cut into 1 ½” pieces.

Closeup of a bowl of cooked beef.

How to make Red Borscht (Beet Soup)

There is no specific technique needed for making an authentic borscht. I do recommend elevating the flavor and including the homemade beef broth. Also, make sure to add the vegetables in a specific order so they can cook to perfection.

Here’s how to make this recipe:

  1. Make the beef broth: Add water, bay leaves, onion, and beef to a large pot. Bring to a boil and then lower to medium heat and simmer for 1 hour. Next, add salt to taste, then cook for 1 more hour. Remove the meat and strain the broth into a large bowl. Set the meat aside and cut into 1-1 ½” pieces once it’s cooled.
  2. Cook the beets and tomatoes: Add the beets with olive oil to a large pan and cook for 8 minutes on low heat. Add in the tomatoes and cook for an additional 2 minutes. Turn off the heat and set aside.
  3. Prepare the borscht: In a soup pot, sauté the onion with olive oil until translucent, then add the shredded carrots and parsnips. Finish by pouring in the beef broth and a pinch of salt. Bring to a boil.
  4. Mix in the veggies: Add the cabbage, potatoes, celery, matchstick carrots, and bell pepper. Finish by stirring in the beets and tomato mixture.
  5. Add the beans and flavor: Now that the soup has been boiling for 15 minutes, add in the beans, ketchup, seasonings, bay leaves, garlic, and chopped parsley. Taste and season as you go.
  6. Finish it up: Turn off the heat and let the soup sit for 5 to 10 minutes so all of the flavors can get to know each other.
Large pot filled with orange soup and green herbs on top

Making beef broth in the Instant Pot

Add water, bay leaves, onion, beef shanks, and salt into your Instant Pot. Set it to cook on high pressure for 45 minutes to 1 hour and let it self release. Remove and set the meat aside, and drain the broth through a strainer. Cut the meat into 1-1 ½” pieces once it’s cooled.

If 10 cups won’t fit into your Instant Pot, add 8 cups of hot water instead.

Can it be made vegetarian?

Absolutely! Just skip the beef broth and use veggie stock instead. Feel free to add in extra veggies or beans for extra nutrients and protein.

3 white bowls of beet soup with bread and sour cream on the side

Helpful recipe tips

  • Make the beef stock well ahead of time to cut down on prep and cooking time. I love using the Instant Pot to cook the broth a day ahead of time so all of the flavors mingle and deepen by the time I need it for the soup.
  • Have all of the ingredients prepped and easily accessible before making the soup. This will save you from scrambling to get everything together. Start by peeling, grating, chopping, slicing, and dicing all of the vegetables, then layout your seasonings in small bowls.
  • Prevent the peeled and sliced potatoes from discoloring by keeping them in a bowl of cold water.

How to serve

Serve up each bowl with a dollop of sour cream and a side of warm bread. For a true experience, eat small bites of raw garlic with each bite. It’s the best Ukrainian medicine!

Closeup of a spoonful of red borscht soup

Storing leftovers

Store the leftover borscht in mason jars or airtight containers when it’s cooled to room temperature. Make sure to leave an extra inch at the top in case it expands. Keep leftovers in the fridge or freezer.

Defrost the leftover soup in the fridge or add it right into a pot on the stove to reheat.

More warm and comforting recipes

Try these recipes to warm you up on a cold day:

  • Chebureki With Beef And Pork 
  • Pork Chops With Tarragon Sauce
  • Mediterranean Chicken And Orzo
  • Instant Pot Beef Ragu
  • Chicken Pot Pies With Puff Pastry

Did you try this Classic Ukrainian Red Borscht (Beet Soup) recipe? Let me know what you think! Leave a comment or rate this recipe below. Don’t forget to take a picture and tag me on Instagram! I love to share all of your recreations!

Print Recipe
4.10 from 22 votes

Classic Ukrainian Red Borscht (Beet Soup)

You’re going to feel warm and comforted after a bowl of this Classic Ukrainian Red Borscht (Beet Soup)! This flexible and frugal recipe is made with heaps of vegetables and a homemade beef broth. It’s the best healthy meal for those chilly days!
Prep Time30 minutes mins
Cook Time30 minutes mins
Beef Broth2 hours hrs
Total Time3 hours hrs
Course: Dinner, Main Course
Cuisine: Ukranian
Keyword: beef, dinner, healthy, main course, main dish, soup
Servings: 6 servings
Calories: 292kcal
Author: Lena Gladstone

Ingredients

Beef Broth

  • 2 beef shanks or beef short ribs, sirloin, or stew meat
  • ½ onion
  • 10 cups water
  • 2 bay leaf
  • salt to taste

Red Borscht (Beet Soup)

  • ½ sweet onion diced small
  • 1 medium carrot shredded. Save the tip to slice into match sticks.
  • 1 cup parsnip cut into matchsticks
  • 8 cups homemade beef broth or storebought
  • ½ medium white cabbage finely shredded
  • 2 medium Yukon gold potatoes or white potatoes, cut into 1/4” thick smaller slices
  • 1 stick celery cut into 1/4 inch slices
  • ½ red bell pepper or 1 Anaheim pepper, diced
  • 1 medium beet red is best, either shred or cut into matchsticks
  • 14 ½ oz can petite diced tomatoes
  • 15.8 oz great northern beans canned, rinsed
  • 1 tbsp ketchup plus more to taste (if needed)
  • 3 cloves garlic put through garlic press or grated
  • ½ bunch parsley or dill finely chopped
  • 2 ½ tsp kosher salt plus more to taste
  • 1 bay leaves

For Serving

  • sour cream
  • bread

Instructions

Homemade Beef Broth

  • In a large pot, add water, bay leaves, onion, and beef shanks. Bring to a boil and then lower to medium heat and cook for 1 hour. Add salt to taste and continue to cook for another hour.
  • Remove the meat, and drain the broth through a strainer to remove any imperfections. Set the meat aside and cut into 1-inch pieces once it's cooled.

Instant Pot Beef Broth Option

  • Add water, bay leaves, onion, and beef shanks and salt. Set the Instant Pot to cook on high pressure for 45 minutes-1 hour and let it self release. Remove the meat and drain the broth through a strainer. Once the meat is cooled, cut into 1-1 1/2-inch pieces. *If 10 cups of water doesn't fit in your Instant Pot, add 8 cups of hot water instead.

Red Borscht (Beet Soup)

  • In a large pan on the stovetop, add the beets with olive oil and cook for 8 minutes on low heat. Add tomatoes and cook for an additional 2 minutes. Turn off the heat and set aside.
  • In a heavy-bottomed pot, sauté the onion with olive oil until translucent. After 5 minutes, add the shredded carrots and cook for 5 minutes. Then add the parsnip and sauté for another 5 minutes. Add the beef broth and salt, and bring to boil.
  • Add the cabbage and potatoes, bring to a boil and cook for 2 minutes. Add the celery and bring to a boil. Add the matchstick carrots and bell pepper, bring to a boil, and cook for 2 minutes. Now add the beets and tomatoes mixture. Bring to a boil.
  • Add in the rinsed beans and ketchup and stir gently to incorporate. Add any additonal ketchup and salt if needed. Bring to a boil, add the bay leaves garlic, and chopped parsley or dill. Bring to a final boil, turn off the heat, and let it sit for 5-10 minutes so the flavors can get to know each other.
  • To serve: Add borsht to a bowl, add chunks of meat, and serve with sour cream and bread.

Notes

MEAT TIP: If your meat has a bone in it, place it in the water whole. After it cooks, remove it from the broth, cut away and discard the bone and cut meat into 1″ pieces. If using sirloin or stew meat, cut into 1 1/2 inch pieces.

Nutrition

Calories: 292kcal | Carbohydrates: 48g | Protein: 21g | Fat: 3g | Saturated Fat: 1g | Cholesterol: 13mg | Sodium: 2379mg | Potassium: 1468mg | Fiber: 11g | Sugar: 12g | Vitamin A: 2684IU | Vitamin C: 74mg | Calcium: 173mg | Iron: 5mg

You might also like:
Baked chicken kabobs on a plate.Baked Chicken Kabobs
Italian stuffed peppers on plate with a side salad.Italian Stuffed Peppers Recipe
Grilled chicken thighs on a plate.Grilled Cilantro Lime Chicken Thighs
Miso glazed salmon bites.Miso Glazed Salmon Bites
Ground Chicken Burgers (Extra Juicy)
Panko Crusted Salmon
Chicken Meatballs and Orzo
One Pot Beef Stroganoff Recipe

Primary Sidebar

Welcome, glad you’re here!

Hi, I’m Lena Gladstone, the recipe developer and food photographer behind Lena’s Kitchen. Here you will find approachable food recipes to share with the whole family. Keto friendly, weeknight dinners all made with fresh ingredients. Click here to learn more!

Let’s Connect

Craving More Easy Recipes?

Subscribe for weekly ideas in your inbox.


More like this

Grilled Skirt Steak

Steelhead Trout Recipe

Kale Caesar Salad

Lemon Basil Pasta Salad

A plate with ground beef, lettuce, tomato, avocado, pickles, French fries, and onions, topped with a light sauce. Extra toppings, fries, and sauce are on the side.

Burger Bowl Recipe

A plate of hummus topped with roasted chickpeas, cherry tomatoes on the vine, chopped red and yellow bell peppers, zucchini, and eggplant, served with a spoon.

Roasted Veggie Hummus Bowl

Plates of shrimp boil with corn on the cob, potatoes, sausage, shrimp, lemon wedges, and parsley, arranged on a white surface.

Sheet Pan Shrimp Boil

A person holds a plate of chopped salad with greens and radicchio, using a fork. Fresh herbs, citrus halves, and drinks are on the table.

Radicchio Fennel Salad with Kale

RECIPE CATEGORY

Craving More Easy Recipes?

  • Facebook
  • YouTube
  • Instagram
  • Pinterest

Home
Recipes
Contact
Shop

FAQ
Privacy Policy
Accessibility

Copyright © 2026 · Site Credits · Sitemap

Rate This Recipe

Your vote:


A rating is required
A name is required
An email is required